If you have been reading this blog for a while, you’ll know that I’m not a millionaire. In all honesty, I’m far from it, or I was until recently. As it stands today, my wife and I work full time with earning about £90,000 and Sarah, my wife, about £40,000 on a Gross Basis. We have a comfortable life, but to boost our savings, we both have second jobs, blogging.
When I tell people about my second job, some congratulate me, others ask us how we have time, but in all honesty, most burst out laughing. Most people think of blogging as something kids do in their spare time, however when they hear how much I made last year last year, the laughing stops.
This week Sarah and I sold four blogs that we have been working on for the last five years and earned just over a million pounds. Not bad for a side job!
Blogging/Websites
Twenty years ago, if you wanted to set up a blog, you had to know how to code. Today life is very different, and the days of having to know specialist coding and website creation skills are long gone.
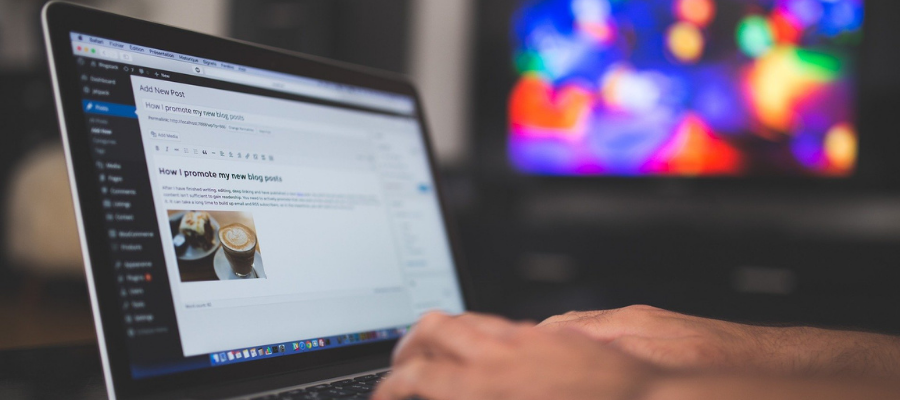
Today, I can build and run my online business from my laptop. All you need is a computer, an internet connection, and to follow some basic step-by-step instructions.
While it’s possible to out-source some of the work, maintaining a blog over the long term will take some time. Sarah and I put in two-to-three hours per day working on our blogs, and while we see the benefit today, you’re not going to earn much in your first year.
Making Money
Generally, there are three ways to make money from your blog. We have really only explored the first two, however there are a lot of people we know that have built there own products and sell them online.
- Affiliate Marketing – is where you refer customers to a product and get a referral fee everytime one is bought. As an example, if you test out a new product and write a review for your readers will a link directing them to where they can buy it, everytime one is bought, you’ll get a commission.
- Advertising – Very simply, companies will place adverts on your website and pay you for each person that views the advert. Typically you’ll be paid on a per thousand views basis.
- Selling Products – this is where you set up your website as an ecommerce platform and sell products directly from it. You can then either use a company like Amazon FBA to help with deliveries, or manage this process yourself.
The First Step
The first step of any business is to think about the website niche. What are you going to specialize in, are you going to sell a product? Are you going to review products? Or is your website going to be an information website about a particular interest of yours.
One point, I wouldn’t spend too long thinking about this section. To many people spend months thinking, they never get around to actually doing anything. For all out blogs, yes there was a general niche for each, but there have been many different directions that each blog has taken over the last few years.
Choose a Domain Name
Once you have come up with your idea, the second step is to buy a domain. Your domain name is the name of your website. It’s your brand and will stick with you for the lifetime of the blog. Below are five tips to get you started in choosing a domain name;
- Make it easy to remember
- Don’t include hyphens or numbers as they are too easy to forget or misspell
- Make sure it’s no longer than three words
- Make sure it’s not rude or crude
- It needs to be unique
Once you have a few domain name ideas, we need to see what’s available and buy hosting to set up your website.
Buying Your Domain Name and Hosting
Once you have a few ideas for a name, you need to buy a domain name and set up hosting. Your domain name is the bit after the www. when you open up a web browser, while the hosting is your place on the internet where you can store all your blog’s data, files and photos.
There are a lot of different option for hosting, some are free, others paid, however if you’re going to take this project seriously, you’ll need flexibility, and this isn’t free. For example, if you want email for your blog, its very difficult with a free plan.
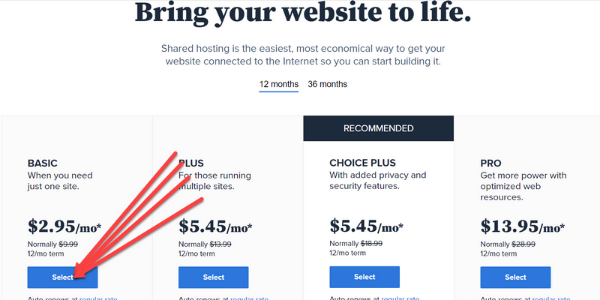
Paid hosting is not expensive and should not cost you more than $60, including the domain name for the first year. I suggest that you head over to BlueHost and sign up for the “Basic” Plan and start your blogging journey. I have used BlueHost for the last ten years, and I’ve never experienced any problems with them.
How to set up hosting via BlueHost
Step 1: Go to the BlueHost website and click the ‘Get Started’ button.

Step 2: Select a plan according to your budget/what you need.
Step 3: Create A New Domain: Unless you have already bought your domain name, press create a new domain and enter your blog name. I would always try to aim for a .com, however, if none of your chosen names are available, you can look at other tlc’s.

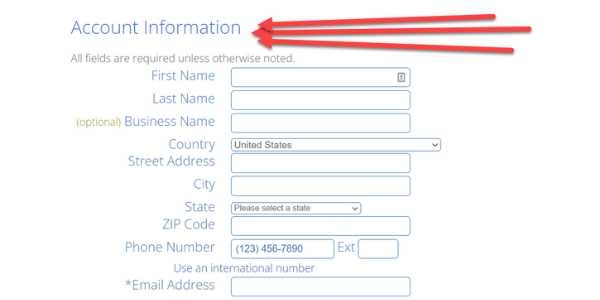
Step 4: Complete your account information, payment information and any extra features you want to add.
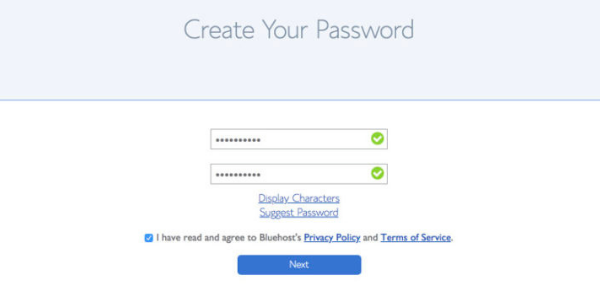
Step 5: Create password to Log into your Bluehost Account
Step 6: Your account is set up, and it’s now time to build your website. A confirmation email will be sent your email address.

Install WordPress
By now, you will have signed up for Hosting with bluehost and have chosen your domain name. The next step is to load WordPress onto your hosting. Bluehost makes this very easy with a “one-click” set-up button, however if you run into problems at any stage, type your problem into YouTube, and there will be step-by-step instructions to fix it.
For now, let’s set up WordPress and log into our website to write our first post.
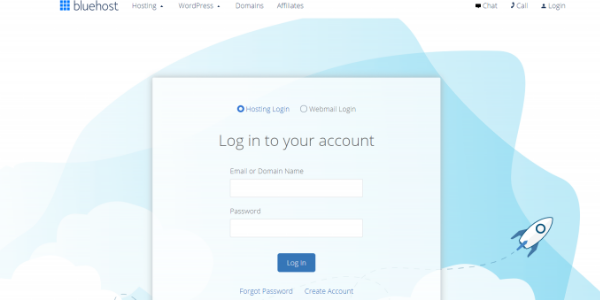
Step 1: Log in to your BlueHost cPanel account. – http://yourdomain.com/cpanel/
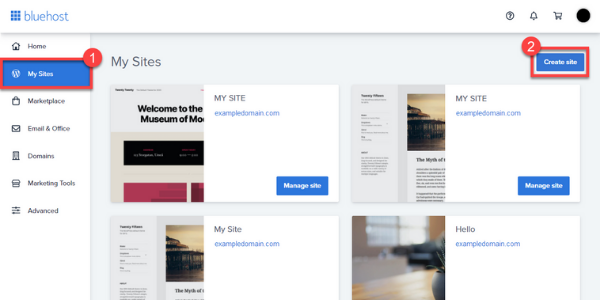
Step 2: Click on ‘Create Site’ in the Website section.
Step 3: You’ll be asked to pick a theme but don’t worry too much about which one to pick because we’ll upload a better one later.
Step 4: Click the ‘Start Building’ button and within a few minutes, your website will be built on the bluehost hosting.
Step 5: Once you’re website is created, its time to log in to it. To log-in, type https://yourdomainname.com/wp-admin.
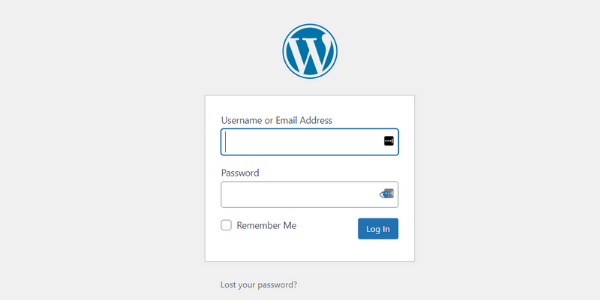
- If you want to log into your website in the future, simply enter your website name followed by “/Wp-admin” to bring up the log-in page.
If you need any further information, you can contact the BlueHost Chat Support or Phone Support 24-hours a day. They will be able to talk you through any problems that you may face.
Customisation
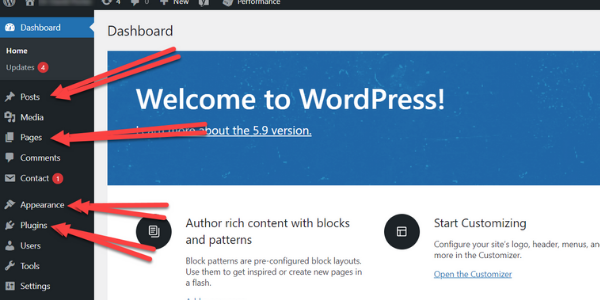
The first time you log into your blog, it will look horribly complicated, however, in reality, it’s actually straightforward. While there is an endless list of customisation options, we’re going to be looking at four, a Theme, Plugins and Publishing your first post using a page and a post.
WordPress themes:
To access your Themes, go to your WordPress dashboard on the left side click: Appearance > Themes.
A Theme is basically a pre-coded layout to how your website is going to look. There are millions of options available to you, both free and paid. Once you have installed your theme, you can simple customise it to your preferences.
Your WordPress blog will come pre-loaded with a few themes as shown below, or you can press the ‘Add New” theme and choose from one an independently designed theme.
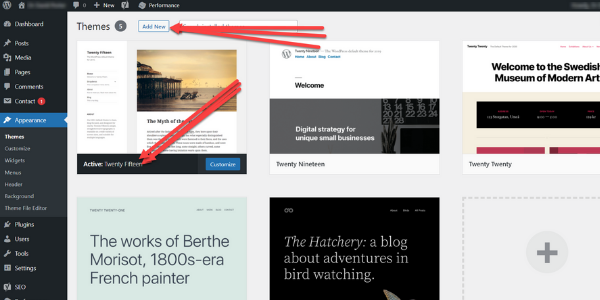
In this example, have set up the blog with a WordPress own theme called Twenty-Fifteen as shown above. To install the Theme, press install, then you can customise it to your preferences.
WordPress Plugins
If a Theme is how your blog is going to look, Plugins are the building blocks that work in the back ground to help your website perform at its best. The WordPress platform has thousands of easy to use plugins that will help you optimise your website.
To access the Plugins Page, click “Plugins” on the left side of the WordPress homepage, and then “Add New”, as shown below.
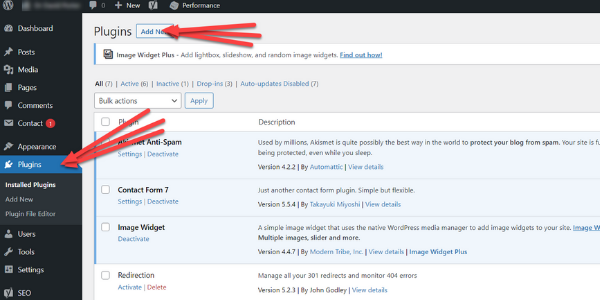
Once you start using your blog, you’ll start seeing more and more plugins that you should be using, however to start your off on your blogging journey, here are a few that I would highly recommend. All are free, and while they may make a paid option, I have only ever used the free option;
- Yoast SEO: Yoast SEO helps optimise your website for Google.
- Akismet Anti Spam: This plugin protects your website from spammy comments.
- Google Analytics: This one provides a lot of useful information about your audience.
- Contact Form 7: This creates a contact form that you can easily use in your blog.
- Image Widget: This helps to place images in the correct place within your blog
Pages Vs Posts
You have two choices for your written content, “Pages” and “Post’s”. The difference is easy, “Pages” are core content for your website. As an example, your contact page should be a “page”, your terms of business, a “page”.
For everything else, use “Posts”. To create a new post, click on “Posts” on the left side of the tool bar, and then “Add New”. This will bring up a new page where you can enter your title and content.

Final Thoughts
If you have got this far, you should now have a blog. Over the next few months, you need to create lots of content on a range of subjects and learn more about website design, and SEO optimisation. Both of these subjects are not difficult, but will require some continued effort, but the good news is that you have now got started, and are now one step closer to making a second living from blogging.
Probably the best place on the internet to learn about both subjects is YouTube. If you having problems, enter the question into the YouTube text bar, and you” find your answer.